There is a particular kind of excitement that comes with finding your first mystery snail egg clutch. You notice it one morning — a compact, pinkish cluster tucked just above the waterline, firm to the touch, almost architectural in its neatness. And immediately, the questions begin.
Are these eggs fertilised? Will they hatch? How long do I wait? And how do I even know if something is developing inside?
These are the right questions to ask. The difference between fertile and infertile mystery snail eggs determines everything that follows — whether you prepare for hatchlings, remove the clutch, or simply wait and watch. Getting this wrong in either direction wastes time or causes unnecessary loss.
This article gives you a thorough, practical guide to distinguishing fertile mystery snail eggs from infertile ones, understanding what affects fertility, and knowing exactly what to do at each stage.
A Quick Overview of Mystery Snail Reproduction
Before diving into egg identification, a brief recap of how mystery snail reproduction works is helpful — because it directly affects whether eggs are fertile or not.
Mystery snails (Pomacea bridgesii) are gonochoric, meaning they have fixed sexes. A male and a female must mate for fertilisation to occur. Unlike pest snails, mystery snails cannot fertilise their own eggs.
After mating, the female stores sperm in a specialised organ and can use it to fertilise multiple clutches over several months — sometimes up to four or five months after a single mating event. This is why a female purchased from a mixed-sex pet store tank may produce fertile eggs long after she is isolated in your home aquarium.
A female will also produce infertile egg clutches — clutches that were never fertilised — particularly if she has not mated recently or if stored sperm has been depleted.
Understanding this distinction is the foundation of everything that follows.
What Do Mystery Snail Eggs Look Like Initially?
Regardless of fertility, all fresh mystery snail egg clutches share the same initial appearance.
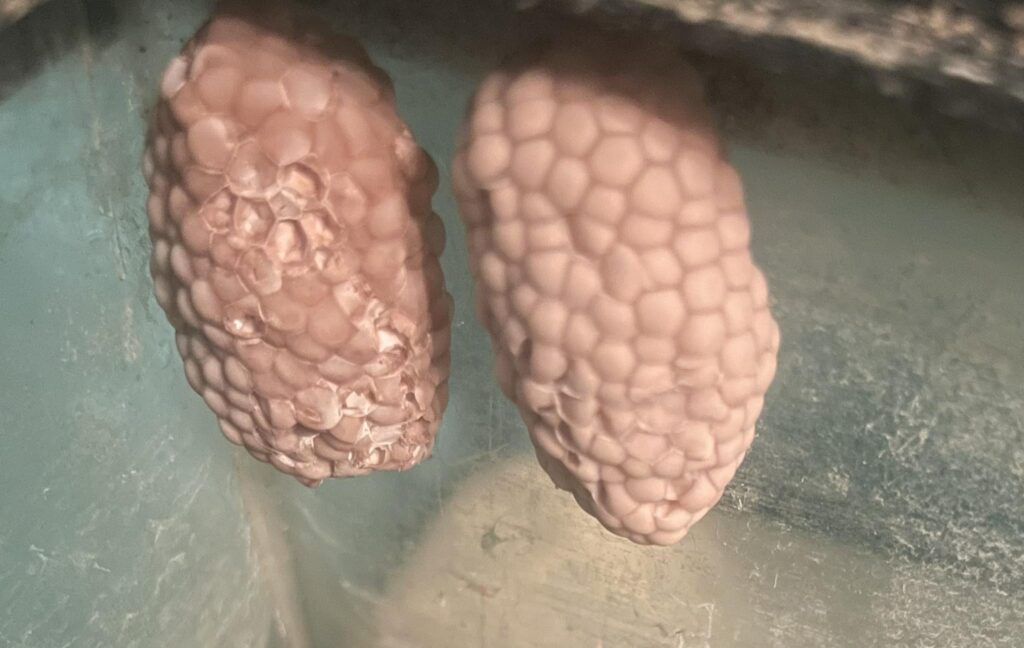
A newly laid clutch is:
- Soft and slightly moist immediately after laying
- Pink to light peach in colour, sometimes almost white depending on the colour morph of the female
- Compact and tightly packed, with individual eggs visible as small, rounded capsules arranged in a cluster
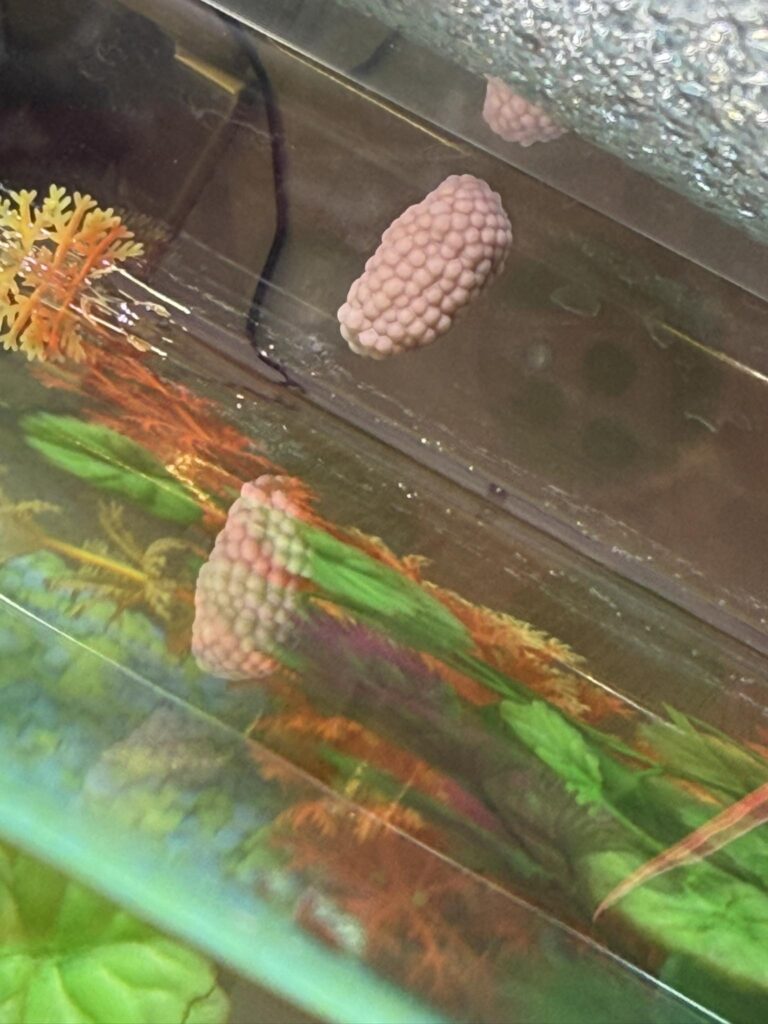
- Deposited above the waterline — on glass, the tank lid, a filter housing, or any accessible surface above the water
- Hardening within 12 to 24 hours as the outer coating dries and firms
A typical clutch measures between 2 and 5 centimetres in length and may contain anywhere from 30 to over 200 individual eggs. Larger, well-nourished females tend to produce larger clutches.
At this early stage, you cannot yet determine fertility by appearance alone. The real differences emerge over the following days.
Fertile vs Infertile: The Key Visual Differences
This is the heart of the article, and I want to be clear and precise here because the differences — while real — require patience and careful observation to detect.
Fertile Eggs: What Development Looks Like
Fertile mystery snail eggs go through visible changes as the embryos develop inside. Here is what to watch for:
Days 1 to 3: No visible difference. A freshly laid fertile clutch looks identical to an infertile one at this stage. Both are pink, firm, and compact. Do not attempt to draw conclusions yet.
Days 4 to 7: Colour deepens slightly. Fertile clutches often begin to darken toward a deeper peach, coral, or salmon tone as the embryos develop. The clutch may also develop a subtle, uniform texture as cells multiply inside each egg.
Days 7 to 14: Individual eggs become visually distinct. In a fertile clutch, individual eggs may begin to show a slight opacity or a small, dark central spot as the developing snail forms inside. Under a bright light or magnifying glass, some aquarists can see faint movement within individual eggs near the end of this window.
Days 14 to 21: The clutch darkens considerably. A fertile clutch approaching hatching often turns a noticeably darker shade — deep peach, tan, brownish, or even greyish. This darkening is a positive sign, not a sign of death. Many first-time keepers panic at this stage and discard what would have been a viable clutch. Do not make this mistake.
Days 21 to 28: Hatching begins. The clutch may appear to fall apart slightly at the edges as hatchlings begin to emerge. Individual eggs break open from the inside. Tiny snails — around 2 to 3 millimetres — drop into the water below.
“The number one error I see from beginners is throwing away a darkened clutch because they think it has gone bad. A clutch that turns dark tan or greyish-brown after two weeks is almost always fertile and close to hatching. Leave it alone.” — Rachel Simmons, freshwater invertebrate breeder and aquarist educator with 14 years of experience
Infertile Eggs: What to Look For
Infertile mystery snail eggs follow a distinctly different visual progression — or more accurately, a lack of one.
Days 1 to 3: Identical to fertile clutch. Again, no reliable distinction is possible at this stage.
Days 4 to 7: Colour begins to fade or stay static. Rather than deepening in tone, infertile eggs tend to maintain their original pale pink or begin to fade toward white or a dull, washed-out beige. The clutch may develop an overall flat, chalky appearance.
Days 7 to 14: Eggs may begin to shrivel, collapse, or discolour unevenly. Infertile eggs do not contain developing embryos to fill the capsule. Over time, the interior dries out, and the eggs may begin to look collapsed or dented. The surface texture may become irregular.
Days 14 to 21: Mould may appear. This is one of the most reliable indicators of an infertile or dead clutch. White, grey, or blue-green mould growing on or between the eggs indicates that no living embryos are present to inhibit microbial growth. A small amount of surface mould on one or two eggs is not always conclusive — but widespread mould throughout the clutch almost always signals infertility or mass death.
Days 21 and beyond: Clutch dries out completely. An infertile clutch that has not been removed will eventually dry out, harden further, and turn chalky white or pale grey. It will not change, darken, or hatch. If you have reached day 28 with no visible darkening or activity, the clutch is almost certainly infertile.
“I tell people to use the colour and mould test together. Darkening without mould? Fertile, leave it. Pale and mouldy? Infertile, remove it. That simple two-part check covers the majority of cases.” — Gregory Okafor, freshwater invertebrate forum moderator and mystery snail keeper of 11 years
The Candling Method: A More Reliable Way to Check Fertility
Candling is a technique borrowed from poultry farming — shining a bright light through an egg to see the interior. It works remarkably well for mystery snail eggs.
How to candle mystery snail eggs:
- Wait until at least Day 5 to 7 after laying.
- Use a bright, narrow torch — a phone flashlight works, but a focused beam is better.
- In a darkened room, hold the torch directly against the back of the egg clutch or beneath it.
- Observe each egg through the translucent outer shell.
What you see in fertile eggs: A developing embryo appears as a small, dark, round shadow within the egg — sometimes described as a tiny dark spot or smudge. As development progresses, the shadow grows larger and may show faint movement near hatching.
What you see in infertile eggs: The interior appears uniform and featureless — clear or evenly pale throughout, with no dark central mass. There is nothing developing inside to cast a shadow.
Candling is not foolproof, particularly in the first few days or with very pale clutches. But from Day 7 onward, it is the most informative visual tool available without disturbing the eggs.
“Candling is underused in the snail-keeping community. I use it from about Day 7 on every clutch. It takes 30 seconds and gives you a clear answer before you have committed two weeks of waiting to an infertile clutch.” — Theresa Baumgartner, freshwater invertebrate breeder with 18 years of aquarium experience
What Affects Fertility in Mystery Snail Eggs?
Understanding the factors that influence fertility helps you improve hatch rates and make sense of why some clutches fail.
1. Presence of a Male
The most obvious factor. If your female has never been exposed to a male mystery snail, her eggs will be infertile. There is no workaround for this. Mystery snails require cross-fertilisation.
However — and this is important — a female purchased from a mixed-sex environment may already carry stored sperm and can produce fertile clutches for months without any male present in your tank. If your isolated female is producing clutches that appear fertile, this is almost certainly why.
2. Sperm Storage Depletion
A female stores sperm from mating and uses it over time. The longer it has been since her last mating, the more likely that stored sperm has been depleted or has lost viability. Clutches produced several months after the last mating event are increasingly likely to be infertile.
If you want consistent fertility, ensure the female has access to a male periodically.
3. Age and Health of the Female
Older females or those in poor health may produce clutches with lower fertility rates, fewer viable eggs, or entirely infertile clutches. A well-nourished, healthy female in her prime — roughly 6 to 18 months of age — produces the most reliably fertile clutches.
4. Water Quality and Nutrition
Poor water quality and nutritional deficiency do not directly cause infertility, but they affect the quality of the eggs produced. Calcium-deficient females may produce thin-shelled eggs with lower viability. Females under chronic stress from poor water conditions may produce smaller clutches with reduced fertility.
5. Temperature During Incubation
Temperature affects not just the speed of development but whether embryos survive at all. The optimal incubation temperature for mystery snail eggs is between 72°F and 82°F (22°C to 28°C). Temperatures below 65°F can slow or halt development; temperatures above 86°F can kill developing embryos.
Clutches exposed to extreme temperatures during the incubation period may die mid-development — appearing initially fertile but failing to hatch. This is sometimes mistaken for infertility.
6. Humidity at the Clutch Surface
Mystery snail eggs are deposited above the waterline precisely because they require air exposure to develop. However, they also need adequate humidity to prevent desiccation. A clutch in an extremely dry environment — a low-humidity room or near a heat vent — may begin to develop and then fail as the eggs dry out.
Ideally, the area just above the waterline should have some natural humidity from the tank water below. A tight-fitting lid helps maintain this.
Should You Remove Infertile Clutches?
Once you are confident a clutch is infertile, removal is generally the right course of action.
Reasons to remove infertile clutches:
- Mouldy clutches introduce fungi and bacteria into the tank if they fall into the water
- Dead clutches attract detritus and can contribute to minor water quality issues
- Aesthetically, white chalky egg masses on the glass or lid are not attractive
How to remove them safely:
Use a credit card, thin spatula, or your thumbnail to gently slide beneath the clutch and detach it from the surface. Infertile clutches are typically easier to remove than fresh ones — they have often dried out and adhere less firmly.
If the clutch is on the glass and you want to avoid scratching, dampen it slightly first to loosen the adhesion.
Dispose of the clutch away from water sources. Do not place mystery snail eggs or snails in natural waterways — mystery snails are considered an invasive species in many regions outside their native South America, and responsible disposal is an ethical obligation for every keeper.
Should You Remove Fertile Clutches? Incubation Options
If you want the eggs to hatch, you have two main options: leave the clutch in place or move it to a separate incubation container.
Option 1: Leave It in the Tank
The simplest approach. If the clutch was laid in a suitable location — above the waterline, with access to humidity and warmth — it can be left to develop in place.
Advantages: No handling, no risk of damage during transfer, no additional setup required.
Disadvantages: When hatchlings drop into the main tank, they may be eaten by fish or sucked into filter intakes. They are extremely small and vulnerable in the first weeks of life.
If your main tank has fish, consider adding a sponge filter pre-filter over the intake before the expected hatch date.
Option 2: Move the Clutch to a Separate Incubation Container
Gently detach the clutch — ideally within the first 24 hours while it is still slightly soft, before it hardens fully — and place it in a small, humid container.
A typical incubation setup involves:
- A small plastic container or breeding box
- A damp paper towel or piece of sponge placed at the bottom (not touching the clutch)
- The clutch suspended above the moisture source on a piece of mesh or resting on the container’s raised inner ledge
- A loose-fitting lid that allows some air exchange while retaining humidity
- Placement in a warm location within the ideal temperature range
Advantages: Hatchlings are protected from predation and filter intake; easier to monitor development; clutch can be inspected without disturbing the main tank.
Disadvantages: Requires additional setup; clutch must be handled; improper humidity can cause the clutch to dry out or become over-saturated.
“I always move clutches to a dedicated incubation box. It lets me monitor each one individually, control humidity, and protect the hatchlings. In a community tank, a mystery snail hatchling has very low survival odds. In a protected box, the survival rate is dramatically higher.” — Pieter van den Berg, Dutch aquascape enthusiast and mystery snail breeder
Caring for Hatchlings After the Clutch Hatches
When fertile eggs hatch, the tiny snails require immediate attention if you want them to survive.
Water transition: Hatchlings are delicate. If you move them from an incubation container to a tank, float a small container of tank water near the hatchlings and allow them to enter gradually, giving them time to acclimatise.
Food: Hatchlings graze on biofilm, algae, and soft surfaces from their first day. Supplement with finely crushed algae wafers, blanched zucchini, and powdered calcium sources. Their shells are extremely thin at birth — calcium availability is critical from the very beginning.
Tank safety: Keep hatchlings in a tank without filter intakes that could suck them in. A sponge filter is ideal for a grow-out tank. Avoid housing them with fish until they reach at least 0.5 to 1 centimetre in size.
Temperature: Maintain warmth — 76°F to 80°F is ideal for rapid, healthy growth in the first months.
Common Mistakes With Mystery Snail Egg Clutches
I have made a few of these myself, and they are worth naming directly.
Discarding a darkened clutch prematurely. As discussed, dark colouration in a mystery snail clutch is a sign of development — not death. A tan or brownish clutch on Day 14 to 21 is almost certainly healthy. Wait.
Assuming all clutches from a single female are the same. A female can produce both fertile and infertile clutches, sometimes in the same season. Evaluate each clutch individually rather than assuming consistency.
Getting the eggs wet during incubation. Mystery snail eggs need humidity — not submersion. Eggs that are submerged will die. This is why they are always laid above the waterline. Keep your incubation setup moist but never wet.
Ignoring mould on the clutch. A small patch of surface mould on one edge of an otherwise healthy clutch may not signal infertility — but widespread mould is a clear indicator that the clutch has failed. Remove mouldy clutches promptly to protect your tank environment.
Handling fertile clutches too roughly. During the first 24 hours, a clutch is soft and more vulnerable to damage. After it hardens, it is considerably more durable. If you intend to move a clutch, do so within the first day while it is still soft and moulds more easily to handling, or wait until it is fully hardened.
Quick Reference: Fertile vs Infertile at a Glance
| Feature | Fertile Clutch | Infertile Clutch |
| Early colour (Days 1–3) | Pink to peach | Pink to peach (identical) |
| Mid-stage colour (Days 7–14) | Deepens — coral, tan, brownish | Stays pale or fades to white |
| Texture over time | Uniform, slightly textured | May become chalky or uneven |
| Candling result | Dark central mass in each egg | Clear, featureless interior |
| Mould presence | Rare, minimal | Common, widespread |
| Late-stage colour (Days 14–21) | Dark tan, grey-brown | Pale white or chalky |
| Outcome at Day 28+ | Hatchlings emerge | No activity; clutch dries out |
Suggested For You:
Mystery Snail Eggs Not Hatching: Common Reasons and How to Fix Them
Mystery Snail Breeding Tank: Your Complete Guide to Raising Healthy Pomacea diffusa Babies
5 Ways to Tell if Mystery Snail Eggs are Fertile
Mystery Snail Eggs Fell in Water? What to Do
Mystery Snail Poop: Identification and Cleanup
Final Thoughts
Watching a mystery snail clutch develop from a fresh pink deposit into a darkened, active mass of hatching juveniles is one of the quiet rewards of this hobby. It is slow. It requires patience. And it requires knowing what you are looking at.
I still find myself checking clutches every morning during the incubation period — there is something irresistible about watching life develop in real time, even if it is only visible under a torch beam.
The key points to remember:
- You cannot reliably distinguish fertile from infertile clutches in the first three days.
- Fertile clutches darken progressively; infertile clutches stay pale or develop mould.
- Candling from Day 7 onward is the most informative visual check available.
- Temperature, humidity, calcium, and sperm availability all affect fertility and hatch rates.
- Dark colouration near hatching is a sign of success — not failure.
- Remove infertile clutches promptly; incubate fertile ones carefully.
Give your clutches the right conditions — humidity, warmth, and time — and you will find that mystery snail breeding is one of the most accessible and genuinely satisfying aspects of freshwater invertebrate keeping.
References
- Cowie, R. H. (2002). Apple snails (Ampullariidae) as agricultural pests: their biology, impacts and management. In G. M. Barker (Ed.), Molluscs as Crop Pests (pp. 145–192). CAB International. University of Hawaii at Manoa, Pacific Biosciences Research Center. https://www.hawaii.edu
- Yusa, Y. (2007). Sperm storage and repeated egg production in the apple snail Pomacea canaliculata: mechanisms and adaptive significance. Journal of Molluscan Studies, 73(3), 241–246. Nara Women’s University, Faculty of Science, Department of Biology. https://academic.oup.com/mollus
- Estebenet, A. L., & Martín, P. R. (2002). Pomacea canaliculata (Gastropoda: Ampullariidae): life-history traits and their plasticity. Biocell, 26(1), 83–89. Universidad Nacional del Sur, Departamento de Biología, Bahía Blanca, Argentina. https://www.uns.edu.ar
- Hayes, K. A., Burks, R. L., Castro-Vazquez, A., Darby, P. C., Heras, H., Martín, P. R., & Cowie, R. H. (2015). Insights from an integrated view of the biology of apple snails (Caenogastropoda: Ampullariidae). Malacologia, 58(1–2), 245–302. University of Hawaii at Manoa & Smithsonian Institution. https://www.hawaii.edu
- Rawlings, T. A., Hayes, K. A., Cowie, R. H., & Collins, T. M. (2007). The identity, distribution, and impacts of non-native apple snails in the continental United States. BMC Evolutionary Biology, 7(1), 97. Florida International University, Department of Biological Sciences. https://bmcevolbiol.biomedcentral.com
Leave a Reply